Digital dentistry has transformed the way dental laboratories manage crown and bridge cases. Instead of relying entirely on physical impressions and manual processes, laboratories can now use digital scans, CAD software, digital quality control, and modern manufacturing technologies to create restorations through a structured workflow.
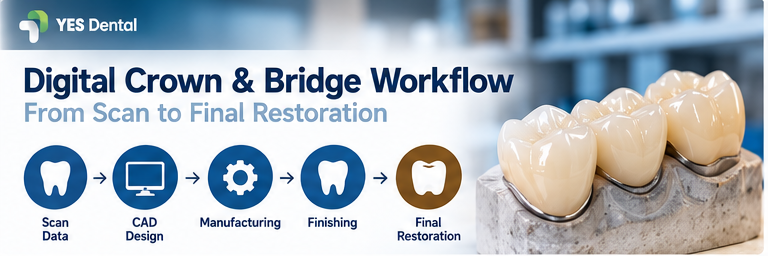
A digital crown and bridge workflow typically moves through several stages:
Digital Scan → Case Preparation → CAD Design → Design QC → Manufacturing → Finishing → Final Quality Control
Each stage contributes to the accuracy and consistency of the final dental restoration. Issues with scan data, margins, contacts, occlusion, or manufacturing parameters can affect the final result, making quality control an important part of the process.
What Is a Digital Crown & Bridge Workflow?
A digital crown and bridge workflow is the process of converting digital patient and preparation data into a digitally designed and manufactured dental restoration.
The process can be used for different restorations, including:
- Zirconia crowns and bridges
- PFM crowns and bridges
- e.max crowns
- PMMA restorations
- Full-metal crowns
- Veneers
- Inlays and onlays
The exact workflow varies according to the restoration type, material, clinical requirements, and manufacturing process.
Step 1: Digital Scan and Case Data
The workflow begins with accurate digital case data. A dental laboratory may receive an intraoral scan directly from a dental clinic or digitized data generated from a conventional impression or model.
Common digital file formats include STL, PLY, and OBJ, depending on the scanner and laboratory workflow.
Before starting CAD design, the laboratory should check whether the scan clearly captures:
- Preparation and margin
- Adjacent teeth
- Opposing arch
- Bite relationship
- Relevant soft-tissue areas
Incomplete or unclear scan data can make accurate CAD design more difficult. Reviewing the incoming case before starting the design can therefore help prevent avoidable revisions.
Step 2: Case Preparation
After receiving the scan, the case is prepared inside the dental CAD environment. The designer reviews the prescription and identifies important case information such as:
- Tooth number
- Restoration type
- Material
- Shade information
- Margin location
- Case-specific instructions
The upper and lower arches are aligned using the bite data so the restoration can be designed according to the intended occlusal relationship.
Clear communication between the dentist, dental laboratory, and CAD designer is particularly important when the case has specific functional or aesthetic requirements.
Step 3: Crown & Bridge CAD Design
The next stage is the digital design of the restoration. Dental CAD software such as exocad and 3Shape Dental System can be used to design crowns and bridges based on the available scan data and case requirements.
For a crown, the CAD designer typically evaluates:
- Margin adaptation
- Anatomical form
- Proximal contacts
- Occlusal contacts
- Material thickness
- Emergence profile
- Cement space
Bridge cases require additional attention to pontic design, connector dimensions, path of insertion, and overall restoration geometry.
The design parameters should also reflect the selected material. A zirconia restoration, for example, may have different design considerations from a PFM restoration.
Dental laboratories looking for external CAD support can explore YES Dental’s Crown & Bridge CAD Design services.
Step 4: CAD Design Quality Control
Before the design moves into production, it should go through a quality-control review.
The CAD QC process can include checking:
Margins: Is the restoration properly aligned with the defined preparation margin?
Contacts: Are proximal contacts appropriately positioned?
Occlusion: Is the restoration designed according to the available bite relationship?
Material thickness: Does the design provide suitable thickness for the selected material and manufacturing process?
Bridge connectors: Are connector dimensions appropriate for the planned restoration and material?
The designer should also verify that the final design follows the dentist’s prescription and case instructions.
This stage connects CAD design, restorative material, manufacturing, and final restoration quality.
Step 5: Manufacturing the Restoration
Once the CAD design is approved, it moves into manufacturing.
The exact production process depends on the restoration and material.
For a zirconia crown or bridge, a typical digital manufacturing workflow may include:
CAD Design → CAM Preparation → Milling → Sintering → Finishing
PFM restorations follow a different production process because they combine a metal framework with a porcelain veneering layer.
Other materials, such as lithium disilicate and PMMA, also have their own manufacturing requirements.
This is why CAD design and manufacturing should be considered connected stages. The digital design needs to account for how the restoration will ultimately be produced.
Step 6: Finishing and Characterization
After manufacturing, the restoration enters the finishing stage.
Depending on the restoration, this may include:
- Polishing
- Staining
- Glazing
- Ceramic application
- Surface finishing
- Final morphological adjustments
The objective is to achieve the required surface quality, anatomy, shade characteristics, and overall appearance while maintaining the functional design established during CAD.
A monolithic zirconia crown, for example, has a different finishing workflow from a veneered PFM crown.
Step 7: Final Quality Control
Before delivery, the completed restoration should undergo a final QC inspection.
The laboratory may review:
- Marginal integrity
- Proximal contacts
- Occlusion
- Surface finish
- Shade and appearance
- Restoration anatomy
- Case instructions
- Overall manufacturing quality
If an issue is identified, it can potentially be corrected before the restoration reaches the dental clinic.
This final checkpoint helps connect the original digital prescription with the physical dental restoration.
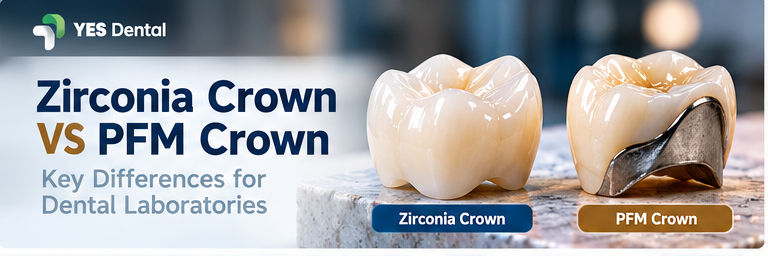
Zirconia vs PFM in the Digital Workflow
Both zirconia and PFM restorations can begin with digital scan data and CAD design, but their production processes differ.
Zirconia and PFM crowns can therefore follow different digital design and manufacturing workflows depending on the material and case requirements.
Zirconia is well suited to a CAD/CAM workflow because the restoration can be digitally designed, milled, sintered, and finished. PFM restorations combine digital design capabilities with a metal framework and porcelain veneering process.
The appropriate workflow therefore depends on the restoration type, material, clinical requirements, manufacturing process, and dentist’s prescription.
Common Digital Crown & Bridge Workflow Errors
Even an advanced digital workflow depends on the quality of the information available at each stage.
Common problems can include:
- Incomplete scan data
- Unclear preparation margins
- Incorrect bite alignment
- Unsuitable proximal contacts
- Inadequate material thickness
- Incorrect bridge connector dimensions
- Incomplete case instructions
A structured QC process during both CAD design and manufacturing can help identify these issues before final delivery.
How YES Dental Supports Dental Laboratories
YES Dental provides digital Crown & Bridge CAD Design and dental restoration manufacturing support for dental laboratories.
Its workflow can support different crown and bridge restoration types, including zirconia crowns and bridges, PFM crowns, e.max crowns, PMMA bridges, veneers, full-metal crowns, inlays, and onlays.
By connecting scan data, CAD design, quality control, and manufacturing within a structured workflow, dental laboratories can manage crown and bridge cases through a more organized digital process.
Frequently Asked Questions
1. What files are needed for a digital crown and bridge workflow?
Digital crown and bridge cases commonly use scan files such as STL, PLY, or OBJ, depending on the scanner and workflow. A complete case may also require the preparation scan, opposing arch, bite data, and relevant case instructions.
2. What software is used for digital crown and bridge design?
Dental laboratories commonly use CAD platforms such as exocad and 3Shape Dental System for designing crowns and bridges. The software used depends on the laboratory’s workflow, equipment, and designer expertise.
3. Can crown and bridge CAD design be outsourced?
Yes. Dental laboratories can outsource CAD design to specialized dental CAD service providers. The laboratory can provide scan data and case requirements while the CAD provider prepares the digital restoration design for review and production.
4. Can zirconia and PFM crowns use the same digital workflow?
Both can begin with digital scanning and CAD design, but their design parameters and manufacturing processes are different. Zirconia commonly follows a milling and sintering workflow, while PFM involves a metal framework and porcelain veneering process.
5. Does YES Dental provide Crown & Bridge CAD design and manufacturing?
Yes. YES Dental provides Crown & Bridge CAD design and dental restoration manufacturing support for dental laboratories, including workflows for zirconia, PFM, e.max, PMMA, full-metal restorations, veneers, inlays, and onlays.